
Introduction
During the membership application process, you activated your Share Wallet on the Virtual Share Exchange (VSE) platform. Here, you either linked to your external bank account, or you saved a credit card number to fund your Share Wallet.
 Important If your electronic fund transfer (EFT) failed, you might need to add a new credit card or bank information before you can fund your Share Wallet. After you save the new card or banking information, continue to Fund Your Share Wallet Manually After EFT Failure in this article for instruction to pay the Total Share Amount Due.
Use this article to add a new credit card or new bank information and to fund your Share Wallet Manually if you received notice of an EFT failure.
Procedure
You cannot make changes by editing any existing account. You must either add new credit card or new banking information.
To manage your account information, follow these steps:
- Sign in to the Member Center.
- In the upper right, select your account icon.
- From the options, select Account. Your account page will open and display your personal information.
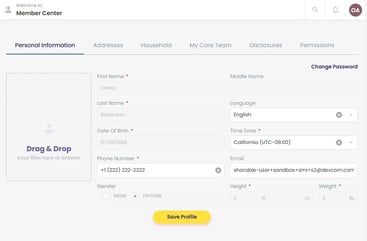
- From the tab options, select Permissions. the Sharing Permissions page opens.

- Based on the type of payment method you use, continue to one of the following step-by-step instruction options in this article to make your payment changes:
- To update your credit card information, see Add New Credit Card Information.
- To change your bank account, see Add New Banking Information.
Add New Credit Card Information
To update your credit card information, follow these steps:
- In the Funding Option(s) section, select Edit.

- Confirm The Payment Method displays Credit Card as your current method of payment.
- (optional) Select the Auto Funding Enabled checkbox to participate in auto funding. For convenience, the ministry recommends auto funding your Share Wallet.
- In the Card Address section, update any necessary changes.
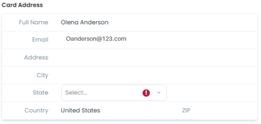
- In the Card Information section, complete the required fields.
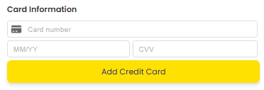
- Select Add Credit Card.
- (conditional) If you opted into auto funding, select Recurring to choose the day you want your Monthly Share Deposit Amount withdrawn from your account. Note: If you choose not to participate in auto funding, you must fund your Share Wallet manually based on the day you receive the Funding Notice.

- From the Funding Option(s) section, select Save. A confirmation note will display

If you had to add new credit card information because of an EFT failure, you are now ready to fund your Share Wallet manually. Continue to Fund Your Share Wallet Manually After EFT Failure in this article to pay the Total Share Amount Due.
Add New Banking Information
To add new banking information, follow these steps:
- In the Funding Option(s) section, click Edit.
- Confirm the Payment Method displays ACH as your current method of payment.
- (optional) Select the Auto Funding Enabled checkbox to particpate in auto funding. For convenience, the ministry recommends auto funding your Share Wallet.
- Select +Add New Account. The Add Account screen opens.
- Select Individual or Business.
- Type the information in the required fields.
- Select Add Account.
- (conditional) If you selected Auto Funding Enabled, select Recurring to choose the day you want your Monthly Share Deposit Amount withdrawn from your account.
- From the Funding Option(s) section, click Save. A confirmation note will display.
If you had to add new banking information because of an EFT failure, you are now ready to fund your Share Wallet manually. Continue to Fund Your Share Wallet Manually After EFT Failure in this article for instruction to pay the Total Share Amount Due.
Fund Your Share Wallet Manually After EFT Failure
Now that you have updated your payment method information, you are ready to fund your Share Wallet. Follow these steps:
- From the navigation menu, select Sharing. A side menu will open.
- From the side menu options, select the right-pointing chevron from the Current Funding Notice card. The Funding Notice page will open.
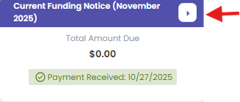
- Select Fund Share Wallet. This action will initiate payment of the Total Share Amount Due, including all past due Share Notices and failed app fees.
Important: An EFT failure turns off auto funding. Even if you previously enabled it, you must select the Auto Funding Enabled checkbox from the Funding Option(s) section. For set up instruction, see Enable Auto Funding.
Tips
Even though you activated your method of payment, it does not replace the required step of sending your share (member-to-member transfers) from your Share Wallet. To read information found in a comparison chart, see Understanding the Difference Between Funding Your Share Wallet and Sending Your Share. You must always manually send your monthly Share payment. For instruction, see Send Your Share.
As a member of REDEEM HealthShare, reading and understanding the Sharing Guidelines is important.