
Introduction
This instructional article guides you through the steps to submit a balance bill. For information about a balance bill, see Determining if You Have a Balance Bill.
The step-by-step information in this article is for submitting a balance bill only. See these other articles to:
Procedure
To submit the balance bill, follow these steps:
- Sign into Member Center.
- From the menu, select Medical Bills.
- Select Submit Bills. The Submit a Bill screen displays.
- Select Balance Bill.
- Complete the required fields.
- Select Next. The Submit a Balance Bill screen displays.
- Match the balance bill statement you received from your provider to the corresponding bill listed under the Additional Information section.
Note: You can filter by Bill # or Service Date or Provider Name. - Select the appropriate bill. The required fields automatically populate.
- Select inside the Drag & Drop Documents here field to upload the bill and any additional documents you have. You must include:
- Balance bill statement.
- (if available) Explanation of Sharing
- (if available) Proof of payment receipt.
- Once you upload your documents successfully, select the consent checkbox.
- Select Next. A prayer request screen will open.
- Type an updated prayer request.
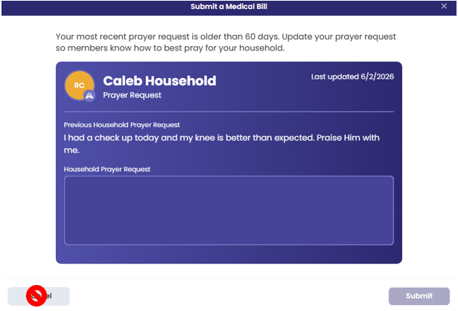
 Important: Do not select Cancel because this will cancel your submission.
 - Select Submit. A confirmation note displays.